

Quick answer: How you stop ribbon from fraying depends on what it’s made of. Synthetic ribbons — satin, grosgrain, nylon organza — respond to heat sealing. Natural fibers like burlap and cotton need folding, stitching, or fabric sealant. Mesh and velvet each have structural quirks that demand their own approach. This guide breaks down the right method for every material.
Why Does Ribbon Fray?
Ribbon frays because woven fibers at the cut edge lose their structural lock. In a woven ribbon, lengthwise warp yarns and crosswise weft yarns interlace in a repeating pattern. When you cut across the width, every yarn at that cut line is severed. Without anything holding those severed ends in place, they slide out of the weave one by one — and that unraveling can travel along the entire length of the ribbon.
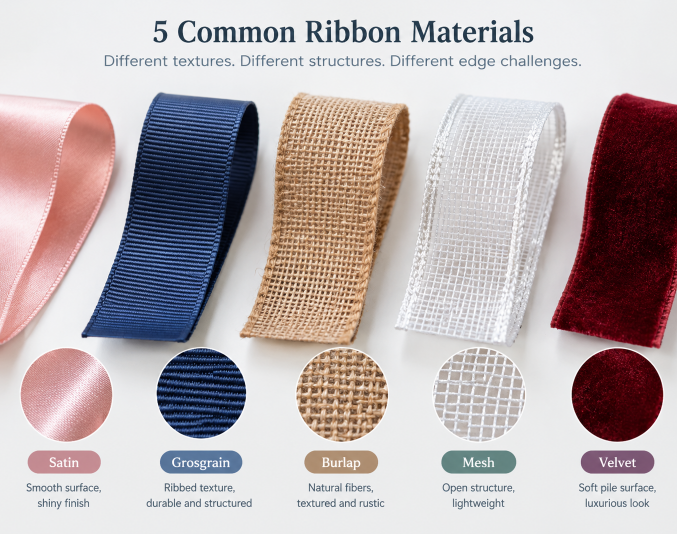
Not all ribbon structures are equally vulnerable. Grosgrain’s tight ribbed weave grips its yarns more firmly, so fraying spreads slowly. Satin’s smooth, slippery polyester fibers release easily, so fraying can appear almost immediately after cutting. Mesh ribbon is an open-network structure rather than a traditional weave — the “threads” are wide strands fused at intersections, and a cut severs those fused joints entirely, creating loose ends that catch on everything they touch.
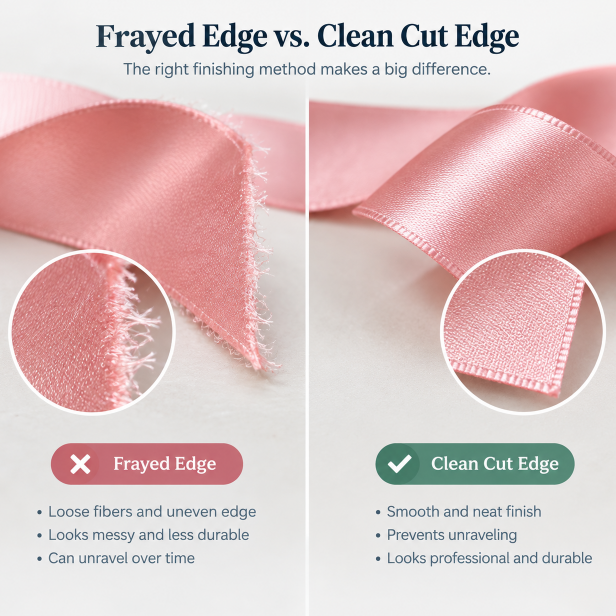
Three variables determine how badly a ribbon frays: fiber content (synthetic vs. natural), weave density, and cut quality. Dull scissors push and pull fibers instead of slicing cleanly, accelerating fraying from the very first cut. A 45-degree diagonal cut exposes fewer yarn ends per unit length than a straight cross-cut, which is why it slows fraying even without sealing.
5 Ways to Keep Ribbon from Fraying
These five methods cover most situations. Match the method to your ribbon material — not every technique works on every type.
1. Heat sealing or hot cutting. For synthetic ribbons (polyester, nylon), passing the cut edge near a flame melts and fuses the fibers into a sealed bead. This is the fastest permanent method. Specialized heat-sealing tools with controlled temperature settings give more consistent results than an open flame. Hot cutting — using a heated blade to cut and seal in one motion — is the industrial version of this technique. Works only on synthetics; natural fibers burn rather than melt.
2. Sewing the edges. Fold the cut end under by about ¼ inch and stitch it down with a slip stitch or zigzag. This is the most durable option for any fiber type and is the standard method for ribbons sewn into garments or home decor. It also works on ribbons that will be washed repeatedly.
3. Using fabric fray sealant. Products like Fray Check or clear fabric glue create a transparent polymer barrier along the cut edge. Apply a thin bead, let it dry completely, and the individual fibers are bonded together. Works on all fiber types. On light-colored or metallic ribbons, test on a scrap first — some sealants can darken the edge slightly.
4. Folding and stitching the cut edge. For burlap, cotton, and other loose-weave natural ribbons, folding the raw edge over and securing it with a seam creates a double-thickness hem that physically encloses the vulnerable cut line. The same folded-and-glued approach works for mesh ribbons when sewing isn’t practical.
5. Choosing ribbon with finished or reinforced edges. Some ribbons are manufactured with factory-sealed edges — hot-knife-cut, ultrasonically finished, or woven with a selvage. These require zero post-purchase treatment. If you’re buying ribbon in bulk for packaging or production work, this is worth specifying with your supplier.
Safety note: Heat sealing with an open flame requires a well-ventilated area and a bowl of water within reach. Never leave a flame unattended.
How to Keep Different Types of Ribbon from Fraying
The five materials below have genuinely different fraying behaviors, cutting requirements, and finishing methods. Treating them identically is the most common mistake in ribbon work.
1. How to Keep Satin Ribbon from Fraying
Satin ribbon’s smooth polyester surface is the least forgiving of the common ribbon types. Its satin weave — where warp yarns float over multiple weft yarns before interlacing — means fewer grip points per inch. Once a fiber slips out of the weave, it travels.
Best method: Heat sealing. Hold the cut edge close to (but not inside) a flame, and rotate the ribbon slowly until the fibers melt and fuse. The seal takes 2–3 seconds to cool. A controlled heat tool gives more consistent results than a lighter, especially for repeated work.
What to avoid: Overheating. Hold the ribbon in the flame too long and the edge darkens, hardens, or forms visible melted clumps. Blackened edges are permanent and cannot be fixed. Test on scrap ribbon first, especially with light colors where scorching shows immediately.
Edge case: Satin ribbons with metallic threads or jacquard patterns may have lower heat tolerance. Metallic accents are more heat-sensitive and prone to fraying than the base polyester. For these, use a fabric sealant instead of heat.
2. How to Keep Grosgrain Ribbon from Fraying
Grosgrain’s crosswise ribbed structure gives it the most secure weave of the common synthetic ribbons. The dense alternation of thick and thin weft yarns creates a physical lock that slows fraying significantly compared to satin. But it still frays when cut.
Best method: Diagonal cut + heat sealing. Cut at a 45-degree angle with sharp scissors, then briefly pass the edge near a flame. The diagonal cut exposes fewer yarn ends, and the heat seal bonds whatever remains. Most grosgrain sold in craft stores is polyester, making it suitable for heat sealing.
For grosgrain that will be handled or washed: Skip heat sealing and fold the cut end under ¼ inch, then stitch. Grosgrain holds a fold crisply, and the stitched hem survives washing, pulling, and repeated handling far better than a heat-sealed edge.
What to avoid: Using dull scissors. Grosgrain’s ribbed texture catches on dull blades, causing the weft yarns to snag and pull before the cut is complete. A dedicated pair of sharp fabric scissors makes a visible difference here.
3. How to Keep Burlap Ribbon from Fraying
Burlap ribbon is a different problem entirely. Its open, coarse weave — whether made from natural jute or synthetic polypropylene — sheds fibers continuously, not just at the cut edge. The individual yarns are thick and rigid, and they work their way out of the weave with minimal handling.
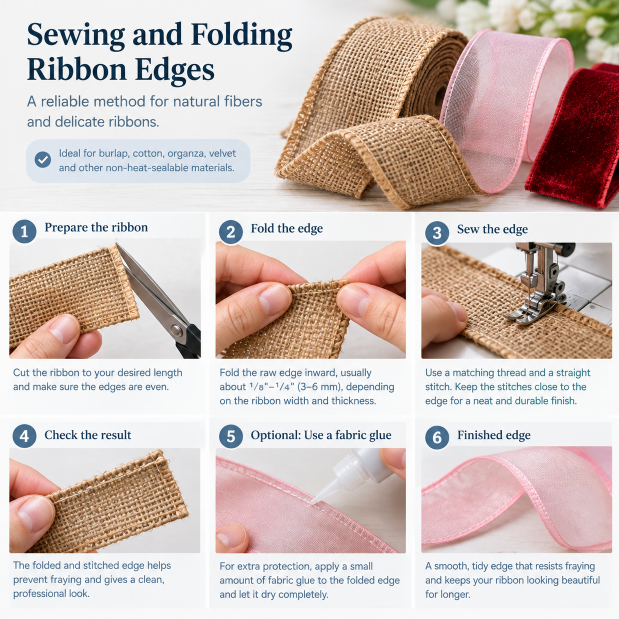
Heat sealing does not work on natural jute burlap. The fibers are plant-based and will burn, not melt. Polypropylene burlap (often sold as “faux burlap” or decorative mesh burlap) is technically heat-sealable, but the open weave means there’s very little material to fuse — the result is unreliable.
Best methods for burlap:
- Fold and glue. Fold the cut edge over and seal it with hot glue or fabric adhesive. This physically encloses the raw edge. It’s the most reliable DIY method for burlap.
- Overlock or zigzag stitch. A serged edge encases the raw fibers in thread. If you have a serger, this is the cleanest solution. Many pre-cut burlap ribbons are sold with factory-serged edges for exactly this reason.
- Iron-on hem tape. A no-sew alternative that bonds a folded edge flat. Quick, but less durable under heavy handling.
What to avoid: Fray Check and similar liquid sealants. They stiffen burlap noticeably and the edge remains visible. On rustic-style projects, a slightly stiff and dark edge is especially obvious.
4. How to Keep Mesh Ribbon from Fraying
Mesh ribbon — deco mesh, geo mesh, and similar decorative open-weave ribbons — has the loosest structure of any ribbon type. It’s essentially a grid of wide strands fused at crossing points. Cutting severs those fusion points, creating loose strand ends on every row. The open structure also means mesh catches on itself, on wreath frames, and on anything with a rough surface, which accelerates fraying.
Best method: Rotary cutter + edge sealant. Use a sharp rotary cutter and self-healing mat rather than scissors. The rolling blade slices cleanly through the fused intersections without tugging individual strands loose. After cutting, apply a thin line of fabric glue along the edge. This smooths the cut ends and prevents them from catching.
Heat sealing considerations: Some mesh ribbons are made from polypropylene or polyester and will melt under heat. Others contain metallic foil or synthetic blends with varying melting points. Because the structure is so open, the heat has to travel further to create a seal. If you try heat sealing on mesh, work on a scrap piece first — the result can range from a clean fused edge to a melted mess depending on the specific material.
What to avoid: Pulling or stretching the mesh after cutting. Even a slight tug widens the openings at the cut edge and releases additional strands.
5. How to Stop Velvet Ribbon from Fraying
Velvet ribbon has a two-layer structure: a dense woven backing (usually nylon or polyester) and a cut pile surface. When you cut velvet, the pile fibers shed immediately, and the backing fabric begins to fray a few millimeters behind the cut line. The visual effect is a soft, fuzzy edge that progresses into structural unraveling.
Best method: Fabric sealant on the backing only. Apply Fray Check or a thin fabric glue along the cut edge, targeting the woven backing rather than the pile surface. The sealant bonds the backing fibers without matting down the velvet pile.
Heat sealing velvet is risky. The pile fibers are extremely heat-sensitive and will singe or mat before the backing fuses. If your velvet ribbon is nylon-based, a very brief pass with low heat might seal the backing, but the pile damage is usually visible. Fabric sealant is the safer choice.
For velvet ribbon in sewn projects: Fold the cut end under and stitch through the backing only. Keep the needle away from the pile surface to avoid crushing it. A fine hand needle with matching thread produces the least visible result.
What About Organza, Cotton, and Other Ribbon Materials?
Organza ribbon is a sheer, fine-weave synthetic (usually polyester or nylon). It frays quickly after cutting because the fine yarns have very little grip on each other. Heat sealing works well — the fibers melt almost instantly, so a very brief pass with a flame is enough. Alternatively, use a fabric sealant. Some organza ribbons come with woven or stitched edges that prevent fraying entirely.
Cotton ribbon behaves like burlap in that heat sealing is ineffective — cotton burns rather than melts. Fray Check or fabric glue works, as does folding and stitching. Cotton twill tape and similar flat-woven cotton ribbons are often manufactured with overlocked edges, so check the product description before buying.
Silk ribbon is expensive and delicate. Heat sealing will damage it. Use fabric sealant or fold-and-stitch. Handle silk ribbon gently — the fibers are fine and prone to snagging.
Wire-edged ribbon (common in decorative bows) has a thin wire along both edges. The wire provides structural support but does not prevent fraying at the cut ends. Cut the wire cleanly with wire cutters first, then heat-seal or glue the fabric edge. Do not put wire-edged ribbon through a sewing machine — the wire will damage the needle and the machine.
Heat Sealing vs. Sewing vs. Fray Sealant
Use this table to quickly match your ribbon to the right finishing method.
| Method | Best For | Not Suitable For | Durability | Time Required | Key Risk |
|---|---|---|---|---|---|
| Heat sealing | Polyester, nylon, satin, grosgrain | Natural fibers, velvet pile, blends with metallic thread | High (permanent fuse) | Seconds per cut | Discoloration, hardened edge, fire hazard |
| Sewing / fold-and-stitch | All fiber types; ribbons in washable projects | Very narrow ribbons (under ⅜ inch); sheer organza | Very high (survives washing) | 2–5 minutes per end | Visible stitching on decorative ribbons |
| Fabric sealant | All fiber types; delicate or heat-sensitive ribbons | Ribbons where stiffness is unacceptable | Medium-high | 15–30 min drying time | May darken light-colored edges; stiffens |
| Diagonal or V-cut | Quick decorative fixes; grosgrain | High-abuse applications | Low (slows fraying only) | Seconds | Fraying still occurs over time |
The pattern is straightforward: synthetic smooth weaves → heat seal; natural fibers and open weaves → fold, stitch, or sealant; heat-sensitive surfaces → sealant only.
Common Mistakes When Preventing Ribbon Fraying
Overheating synthetic ribbon. The single most common error. Holding the ribbon too close to the flame or leaving it in the heat too long produces a blackened, hardened edge that looks worse than the fraying it was meant to prevent. Move quickly and check the seal after each pass.
Using heat on natural fibers. Burlap, cotton, and silk will burn, not melt. Burning creates a charred, brittle edge that crumbles. Use sealant or stitching instead.
Using the wrong adhesive. Thick craft glue leaves visible blobs and takes hours to dry. White school glue doesn’t bond synthetic fibers. Use a purpose-made fabric sealant or clear fabric glue. Test any adhesive on scrap ribbon first — some products darken light-colored or metallic ribbons.
Ignoring fiber content. “Ribbon” is not a material. Two ribbons that look identical on the shelf can behave completely differently under heat, scissors, or sealant depending on whether they’re polyester, nylon, cotton, or a blend. Check the label or test a scrap before committing to a method.
Skipping the pull test. After sealing a ribbon end, tug it gently in opposite directions. If the seal holds, the edge is sound. If fibers slip, the seal is incomplete. This 5-second check catches problems before they show up in a finished project.
Frequently Asked Questions
Can I use a hair straightener to heat-seal ribbon?
A flat iron can work for sealing synthetic ribbon edges if you set it to low heat and sandwich the ribbon between a piece of parchment paper. The parchment prevents melted ribbon from sticking to the plates. Test on scrap first — flat irons vary widely in temperature, and some run hot enough to scorch polyester.
Does clear nail polish work as well as Fray Check?
It works for small projects and thin ribbons, but it’s less durable than purpose-made fabric sealant. Nail polish stiffens the edge more and can yellow over time on light-colored ribbons. For anything that will be handled, washed, or displayed long-term, Fray Check or fabric glue is the better investment.
How do I keep ribbon from fraying without heat, glue, or sewing?
The diagonal cut is your only option, and it only slows fraying — it doesn’t stop it. Cut at a 45-degree angle with the sharpest scissors you have. This works acceptably for grosgrain and thicker woven ribbons in decorative applications where the ends aren’t handled.
Can burlap ribbon be heat-sealed if it’s the synthetic kind?
Synthetic burlap (polypropylene) can technically be heat-sealed, but the open weave means there’s very little material at the cut edge to fuse together. Fold-and-glue or overlocking is more reliable. If you must heat-seal synthetic burlap, use a hot knife rather than a flame for better control.
What’s the best way to finish ribbon ends for gift wrapping?
For a quick, clean finish: cut at a 45-degree angle or in a V-shape (fold the ribbon lengthwise and cut diagonally from the outer edge to the fold). If the ribbon is polyester or nylon, a quick pass near a flame seals it permanently. For a high-volume wrapping setup, a ribbon heat-sealing tool cuts and seals in one motion.
Do pre-sealed ribbons exist?
Yes. Many ribbon suppliers offer hot-knife-cut or ultrasonically finished edges as a standard or optional service. Ultrasonic finishing produces a softer, cleaner edge than heat cutting and is commonly used for narrow satin ribbons in premium packaging. If you’re buying ribbon in bulk, ask your supplier whether edge finishing is available.
Conclusion
Preventing ribbon fraying starts with one question: what is this ribbon made of? Synthetic ribbons — satin, grosgrain, nylon organza — respond to heat sealing. Natural fiber ribbons — burlap, cotton, silk — need sealant, folding, or stitching. Mesh and velvet each have structural quirks that require their own approach.
For one-off craft projects, a lighter and a pair of sharp scissors cover most situations. For bulk purchasing or production work, the answer is different: specify factory-sealed edges from your ribbon supplier and eliminate the finishing step entirely. Whether you’re a DIY crafter or a procurement manager, the principle is the same — identify the material first, then choose the method that matches it.